What are the basic steps for drawing an anime eye?
Drawing anime eyes is a popular skill among aspiring artists, and understanding how to draw a simple anime eye is a fantastic starting point for anyone looking to delve into anime art. Anime eyes are known for their expressiveness and stylistic features, making them a key component in character design. In this article, we will provide a step-by-step guide on how to draw a simple anime eye, covering everything from basic shapes to finishing touches.
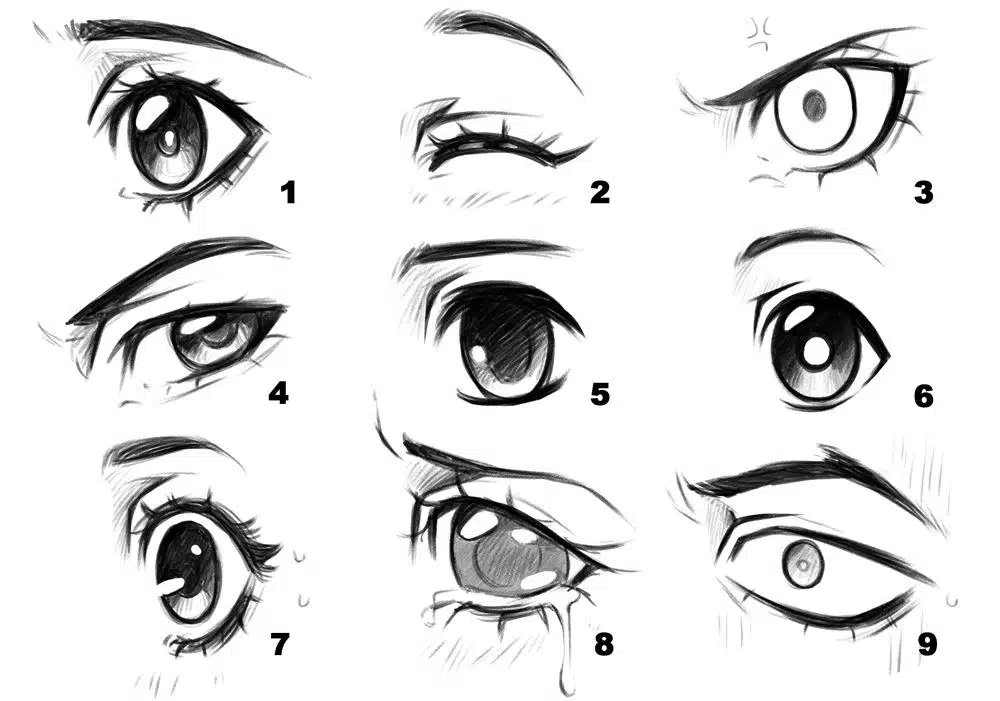
Understanding Anime Eye Anatomy
Anime eyes have a unique anatomy that sets them apart from realistic human eyes. Here are the essential parts of an anime eye:

- Used Book in Good Condition
- George Trombley (Author)
- English (Publication Language)
- 376 Pages - 08/22/2014 (Publication Date) - Learn From Zero (Publisher)
Major Components of Anime Eyes
- Iris: The colored part of the eye that can vary in size and style.
- Pupil: The black center of the iris, often depicting light reflections that give the eye depth and emotion.
- Eyebrow: Often exaggerated in anime for emotional effect, eyebrows can change the perception of character feelings.
- Lid Shape: The upper and lower eyelids can be drawn in various styles, influencing the eye’s expression.
Drawing Tools for Creating Anime Eyes
Before diving into the drawing process, gather your tools. Here’s a quick list of essential items:
| Tool | Purpose |
|———————|———————————————–|
| Pencils | For sketching basic shapes and outlines |
| Eraser | To correct mistakes and refine shapes |
| Fine Liners | For outlining the final anime eye |
| Colored Pencils | To add color and shading |
| Paper | The surface where your artwork will be created|
- Used Book in Good Condition
- George Trombley (Author)
- English (Publication Language)
- 376 Pages - 08/22/2014 (Publication Date) - Learn From Zero (Publisher)
Step-by-Step Guide on How to Draw a Simple Anime Eye
Now that we understand the basic components and tools needed for drawing an anime eye, let’s step into the detailed process of how to draw a simple anime eye.
Step 1: Draw the Basic Shape of the Eye
Begin by sketching out the basic shape of the eye. Anime eyes come in various shapes—some are round, while others may be more oval or elongated. Use light pencil strokes to create a guide outline.
- Start with an Oval Shape:
– Draw a horizontal oval, ensuring it’s wider than it is tall.
- Add the Upper Lid:
– Draw a curved line on top of the oval to represent the upper eyelid, giving it a slight slope.
- Define the Lower Lid:
– Add a subtler curve at the bottom of the oval for the lower eyelid, ensuring it connects smoothly with the upper lid.
Step 2: Adding the Iris and Pupil
To create a lifelike appearance, you need to add the iris and pupil to your drawing.
- Draw the Iris:
– Inside the oval, sketch a smaller circle for the iris. Position it slightly off-center to create depth.
- Incorporate the Pupil:
– Draw a small black circle in the center of the iris to form the pupil.
- Reflections for Depth:
– Add a small white dot or several dots around the pupil to represent light reflections. This step is crucial for creating the characteristic sparkle in anime eyes.
Step 3: Detailing the Eye
Now it’s time to enhance your drawing with details that bring it to life.
- Shading the Iris:
– You can add shading to the iris by creating a gradient effect. Press harder on the pencil at the outer edges and lighten it as you move towards the pupil.
- Thicken the Eyelids:
– Outline the upper and lower eyelids with a fine liner to give them more definition and prominence.
- Add Eyebrows:
– Above the eye, sketch the eyebrow using bold lines. The shape and thickness of the eyebrow can affect the character’s expression.
Step 4: Final Touches
In this final step, we solidify our artwork by adding final touches.
- Incorporate Highlights:
– Highlight the eye areas, such as the area below the eyebrow and at the corner of the eye, to add complexity and flair.
- Refine Lines:
– Go back through your drawing and refine lines, ensuring they are smooth and complete.
- Erase Guides:
– Carefully erase any remaining guide lines that aren’t part of the final design.
- Additional Shading:
– Add any additional shading around the eye to create depth and emphasize the features.
Common Mistakes When Drawing Anime Eyes
When learning how to draw a simple anime eye, artists often make some common mistakes. Here are a few to be aware of:
- Overly Symmetrical Eyes: Anime eyes can differ slightly from each other; embrace the imperfections to add character.
- Neglecting Light Sources: Always consider where light is coming from. Reflections and shadows enhance the eye’s dimensional quality.
- Skipping Expressions: Experiment with different lid shapes and eyebrow angles to convey emotions effectively.
Practice Tips for Mastering Anime Eye Drawing
Mastering the art of drawing anime eyes takes time and practice. Here are some tips to help refine your skills:
- Study Different Styles:
– Spend time analyzing eyes from various anime and manga styles. Understanding the differences can elevate your drawing.
- Keep Practicing:
– Regularly practice by drawing different eye shapes, colors, and emotions. Repetition is key to improvement.
- Use References:
– Look at high-quality references to understand how light and shadow interact with the eye.
- Join Online Communities:
– Share your drawings with others and seek constructive feedback to grow as an artist.
Conclusion and Final Thoughts
Now that you’ve learned how to draw a simple anime eye, it’s time to start your own artistic journey! Combine practice with creativity, and don’t be afraid to experiment with different styles and expressions. Remember, the key to mastering this skill is persistence and passion.
Further Reading and Resource Links
To enhance your understanding of anime drawing, check out these reputable sources for insightful tutorials and tips:
Incorporate these tips and techniques, and soon you’ll be drawing expressive and captivating anime eyes with ease.

